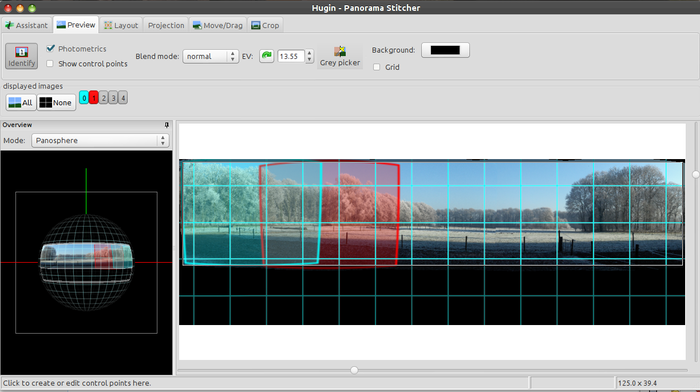
Hugin Preview tab
Preview tab
Identify
Using this tool you can find where your images are and match them to their number. You can also edit control points.
Move the mouse over the visibility buttons for the images (the numbers at the top left of the preview) and the corresponding image lights up red in the preview. When this tool is turned on, moving the mouse over the panorama highlights all the images under the mouse in different colours. The buttons for those images light up in matching colours. The same can be achieved when holding the Control key and moving the mouse over the panorama.
Tip: We are now in the Simple Interface, and when everything runs smoothly you should not need this tip. However, when the mouse is on the overlap of two images, you can click inside the overlap, and the Control Points tab of the Panorama Editor[*] will open to edit the control points between those images.
Photometrics
This enables full photometric correction. When turned on, this will cause significant delay when changing photometric parameters. It also takes a while to turn on and off. However, with it enabled you get much better representation of the colours in the output. With it turned off, you get correction only for exposure and white balance. With it turned on, you also get vignetting and colour response correction.
Show control points
When this tool is turned on, all Control points are drawn as lines with crosses at each end. Green, yellow, orange and red lines and their crosses indicate "normal" control points. A red control point is misaligned (the ends of the line are father apart), and a green control point is well aligned (the ends of the line are almost in the same position). Blue indicates horizontal control points, vertical control points or straight line control points.
Blend mode
The normal blend mode will draw the images with the first photos in the project above later photos, as this approximates the order that blending is performed. The difference blend mode will do the same, except the image under the mouse pointer will be subtracted from the rest of the stack. Use this to determine if the alignment went well: where you can see edges in the subtracted image, these edges are misaligned. Be warned that this isn't fully accurate, and the other preview has a better difference mode.
EV
EV stands for Exposure Value. Clicking the Reset button will set it to the average of all the input image exposures, or setting it to 0 (zero) will result in no exposure change being applied to the panorama (note that unless all the photos also have their individual EV set to zero in the Hugin Camera and Lens tab[*], they will likely appear incredibly bright or dark).
EV is a standard photographic scale; each increase or decrease by one unit will change the exposure by the equivalent of one f-stop (i.e. halving or doubling the exposure). It is worth adjusting the exposure here in Hugin rather than later in an external image editor, since Hugin uses the camera response curve calculated in the Exposure tab to perform the correction in a linear colour space.
The average value isn't always wanted. If you see colour artefacts in bright sky areas, set this to the negative of the darkest input image; this has a side-effect of clipping brighter images.
Grey Picker
Hugin can align the white balance (w:Color balance[*]) of the photos in the panorama to match that of the anchor photo; this is done in the Align... button in the Assistant tab. Usually this anchor is the first photo in the project, but it can be changed using anchor this image for exposure in the Photos tab.
However, often neither the first photo nor any of the photos in the project has the desired or correct white balance. You can use the Grey Picker button to adjust the white balance of the whole panorama by using any "neutral" colour object in the scene as a sample. Just push the button and then click on the object in the preview canvas.
An ideal neutral colour object is white or grey; this could be a test card, an overcast sky, snow or a white object. It is important to remember that white paint and paper comes in lots of colour shades, so it really isn't very reliable. Prefer a transparent material that is white due to light diffusion, such as etched glass or polystyrene foam. Avoid objects that are "blown out" or which are in shade and illuminated only by secondary light sources in the scene.
