
Hugin Overview
This tutorial explains the different stages of the panorama stitching process and discusses the concepts involved.
1. Collect Your Images
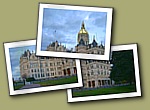 The first step to
making a great panorama or photomosaic is to start with a number of
photographs.
The first step to
making a great panorama or photomosaic is to start with a number of
photographs.
Add your image files to Hugin's project on the Images tab. If you used uncropped JPEG format images, the embedded EXIF information from your digital camera will provide field of view (FOV) numbers automatically. If you've cropped down, or used other image formats, you'll have to compute and enter the field of view manually.
Hugin allows images to be added in any orientation, in any direction. However, you may find it easier to give Hugin a few approximate hints about where each image belongs. You can specify a certain image to be your guidepost, or anchor. The anchor image will not be moved around, but all of the others will be moved to align to it. You can also specify yaw, pitch and roll orientation for each image, if you know them. Changes to these numbers will be reflected immediately on the Panorama Preview.
Picture-Taking Tips
Some less-powerful panorama tools suggest that you use a level camera and a firm tripod, and even a special "head" for your tripod. A panoramic head is a good idea for indoor shots, but with Hugin, you can take any number of photographs in any orientation. For outdoor photographs, even handheld images usually work just fine.
When taking your series of photographs, try to get about 20% to 30% overlap between shots, so you'll have enough detail to stitch images together. Some lenses have blurry performance near the edges, so you might want even more overlap to ensure the mosaic will feature your best detail from the centers of each image. If there's a principal feature in the scene, try to capture that feature completely in just one of the images.
If your camera allows you to specify a "Manual" exposure mode, use it. Meter for the average or the brightest area of your panorama, and use the same metering for all images of the set. This technique will give the best color blending overall. Hugin can try to blend the exposure levels but post-processing is never as good as capturing the right images directly in the camera.
Another trick to keep the tonality even is to specify the white balance, instead of leaving it to auto. Either calculate the white balance using a white or neutral grey surface, or just choose one of preselected white balance settings: sun, shade, etc. The reason is that auto white balance can change between views, giving for example a blue cast on one picture and a yellow cast on another.
2. Check Your Camera
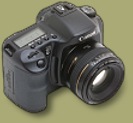 Once you have your
images collected, it's time to review the camera and lens
properties. Every lens is different, even if they're the same model
by the same manufacturer.
Once you have your
images collected, it's time to review the camera and lens
properties. Every lens is different, even if they're the same model
by the same manufacturer.
You may want to configure your lens properties, if you know them, on Hugin's Camera and Lens tab.
Hugin can automatically determine some of the properties of your lens, just by studying how the features match up in the overlapping areas.
3. Tie Your Control Points
 Here's where
you'll spend the most time when developing a new panorama. Just
like sewing two pieces of fabric together, you must choose a series
of corresponding locations between each overlapping pair of images.
Hugin will calculate the best way to align those images, just like
pulling a thread tightly through all the points you've pierced with
your needle.
Here's where
you'll spend the most time when developing a new panorama. Just
like sewing two pieces of fabric together, you must choose a series
of corresponding locations between each overlapping pair of images.
Hugin will calculate the best way to align those images, just like
pulling a thread tightly through all the points you've pierced with
your needle.
On Hugin's Control Points tab, you can see a pair of images you've included in your project. Each image has a number, and you can choose which two images are shown at any time with the numbered tabs.
Choose two different images which overlap each other. Find a distinctive feature which is visible in both images. Find the corner of a building's window or rooftop, or maybe a distinctive rock on the ground. The sharper and more contrasty, the better. Click on that feature in both images. A control point pair is made.
Add at least three or four pairs of control points within the same pair of images, and you'll see them added to Hugin's list. Each pair is shown in a unique matching color. Once you have enough pairs, you can move on to a different pair of images, and repeat the process.
Tips on Choosing Image Features
Zoom in to 100%. It takes more scrolling around, especially with high resolution images, but you can choose and place your points much better when you can see the fine details in each image.
Turn on the "Auto Fine-Tune" feature to allow Hugin to adjust your points for the best fit. However, you should still review those results! Hugin may be confused if there are a number of similar features nearby, like a row of identical windows.
Avoid adding points that are too close to the image edges, where your camera's lens doesn't perform as well. You probably never noticed this phenomenon before, but when you compare the same details in different image positions, side by side, it sure shows up!
If you took the photographs without a panoramic head for your camera tripod, don't choose any features in the near foreground for control points. You'll likely encounter parallax error, which can confuse Hugin during optimization. Outdoor scenes where most features are in the distance will have less of a problem with parallax.
4. Run the Optimizer
 Now it's Hugin's
turn to do some fancy math work. You have several choices you can
make, which will affect the style of panorama or mosaic you want to
produce, all available on Hugin's Optimizer tab.
Now it's Hugin's
turn to do some fancy math work. You have several choices you can
make, which will affect the style of panorama or mosaic you want to
produce, all available on Hugin's Optimizer tab.
The most important button is "Optimize Now!" It's so important, that you can run Hugin's Optimizer at any time, from any tab, using the quick button on the Hugin toolbar.
Hugin will start computing the best distortions for your images, as soon as you press the Optimize Now button. A progress window opens to show the current displacement. Hugin tries to minimize that number. When Hugin can't get any lower, no matter how it tries, the Optimizer is done.
For your first pass, just optimize the yaw, pitch and roll of your images. (That's the Optimizer's default.)
As a guideline, the average error should be less than 1 pixel for an excellent fit, and the maximum error should only be 5 pixels or less. Of course, this varies with the quality of the original images, as well as placement of the control points.
If you're getting bigger numbers, then it's time to review those control points. Bring up the Control Point Table with another button found on Hugin's toolbar. You can find the worst error offenders here; click on any line to show that control point pair. You can decide what to do with those bad fits: delete or reposition those points.
If your points look good, but the average error is still too high, add more control point pairs. You want a nice spread between your control points, and not just a couple in a straight line.
Once you get good results, you can get better results by optimizing more variables. You can optimize for every variable at once, but this is slower, and can even fail if your initial guesses weren't good enough.
Some stitches require many runs of the Optimizer, and many returns to the Control Points tab, before you find your best possible results. Watch the Panorama Druid in the Preview window for more tips on getting a great alignment.
Understanding Projection Types
There are three major types of projection. Understanding their differences will be useful in getting the mosaic you imagined.
- Rectilinear
- Most camera lenses are designed to keep any straight lines in your subject as straight as possible in the image. This mosaic projection continues that goal. It's great for architecture since you can be sure that the roofs and walls don't curve unexpectedly. A mosaic in this mode emulates a single image taken with a wider angle rectilinear lens.
- The downside to a rectilinear projection is stretching. You will notice that the photographs get stretched out more and more, as they get farther from the Yaw=0, Pitch=0 center point. The corners of the photograph may even stretch into a sort of butterfly arrangement. This means that you will have to crop down to a center portion of the image, and you won't be able to make really immersive images.
- Cylindrical
- Another projection works to combat the image stretching problem. Each source image is projected onto a surface such that the area it occupies is as close to the original area as possible.
- Equirectangular
- The last projection is also the most immersive: each source image is calculated to represent a certain view window in space. Some images can be stitched directly overhead or underfoot to achieve a complete spherical bubble containing the viewer.
5. Run the Stitcher
 After all of the
other steps are complete, Hugin is ready to crunch some pixels. You
can request a final mosaic on the Stitcher tab. This is a
computationally intensive step, and will need a lot of memory to
perform all the image processing required.
After all of the
other steps are complete, Hugin is ready to crunch some pixels. You
can request a final mosaic on the Stitcher tab. This is a
computationally intensive step, and will need a lot of memory to
perform all the image processing required.
Similar in layout to the Optimizer tab, you will find the key button is labeled "Stitch Now!"
Hugin will load each image in turn, and distort it according to the required projection. If requested, it will then work to adjust the exposure for color and/or brightness. Lastly, it will blend all of the images together into the final image file you specify.
You can now move on to another tutorial.
Author and images Ed Halley — Created November 2003